Wednesday, May 22, 2019

Vogue 9297

 I say this every time I sew a pattern from a Big 4 company: I don't know why I don't do it more often.  I like everything that I sew from the bigger companies.  This time, I paired a rayon from Style Maker Fabrics with Vogue 9297 and I love the result!

The fabric is wonderful: It's got some texture to it but is still soft and floaty. I highly recommend it if it's still available. It's sheer so I lined it with a basic white cotton.
It's a Very Easy Vogue pattern, so there wasn't much to the construction. One front bodice with darts, one back bodice with darts, and then two pieces for the front and back bottom portion. I used an invisible zipper instead of the standard one it called for, and I stitched the belt to the back so that it wouldn't slip around as I move. 

Happy sewing!

Sunday, May 5, 2019

Colette Parfait

In the past several months I've had several makes that were tragically bad, and so to being the summer sewing season I picked something I know I like and can make successfully: The Colette Parfait dress.  This was one of the first patterns I ever made and I've always loved it.  

I added piping to the gathered pockets:
The fabric is Liberty of London and it's sheer, so I omitted the facings and added a lining.  I didn't understand how to do that when I first started, so I'm going to describe it here in case anybody needs it:  It's overwhelming when you're first starting out, but it's actually really easy. 
1. When sewing the Liberty of London fabric, I only used one front midriff piece and one back midriff piece.  I put them front sides together with the bodice and skirt, and after stitching the seam I serged the seam allowance.
2. The invisible zipper is sewn to the shell fabric. 
3.  I used a simple white cotton for the lining.  I put it together exactly like I did the shell fabric, with no facings and only one front and back midriff piece.  I also cut the skirt pieces one inch shorter than the shell fabric so they don't poke out of the hem.
4. With right sides together and the edges serged, I places the lining fabric on top of the invisible zipper and sewed right down the zipper on top of the lining fabric.
5. Switching to a regular foot, I pinned the top of the shell and lining together and stitched right across the top. You'll also notice that I put my gathers right in the middle of the bodice instead of under each cup.  I like it better that way. 
6. I then flipped it right side out, pressed the seam, and topstitched it.  I know an invisible zipper is supposed to be invisible, but I always find that the fabric gets caught in the zipper even if I press it.  I sew a straight topstitch along the zipper to keep everything tucked in where it's supposed to be.  

Happy sewing!


Wednesday, October 24, 2018

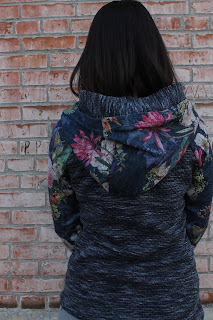
New Horizons Tami Revolution Double Hoodie


This hoodie is, hands down, the best thing that has come out of the 2018 RTW fast.  I saw a version on the group Facebook page earlier in the year and my jaw dropped.  I knew I had to make one.  


The hoodie has a slim fit, so the instructions suggest going up a size if you want more room.  I made the size that corresponds to my measurements and it fits just fine.  It has shape to it but there is still room to move.

The instructions are incredibly easy to follow, although I did get a little bit confused on the difference between the double hood and conversion hood instructions.  I've gotten to the point in my sewing career where I don't have to pay that much attention to the instructions, so I just did what felt intuitive.  


The fabric is from Style Maker Fabrics.  The navy blue fabric has incredible recovery and I wouldn't mind having two more tops in the same material.  

The hood is enormous when it's pulled up, which makes me feel like I'm in the Lord of the Rings.  


I want more of these hoodies for fall!

Sunday, July 29, 2018

Sew Over It Charlotte Dress

I rarely sew summer dresses with sleeves, but I loved the bodice on the Sew Over It Charlotte dress so much that I went for it.

The pattern directions are very easy to follow.  No big thrills on putting it together, but I did have to sew six machine stitches where the bodice overlaps because the gaping was really bad without an anchor there.  The lapels fold back over the stitches and you can't even see that they are there.  
There are pockets! This was an easy end-of-summer sew.  


Sunday, June 10, 2018

Christine Haynes Sylvie Dress #3

I haven't had a new dress in quite awhile! Last summer I only made shorts and read a bunch of books so this summer I'm trying to focus on adding new dresses into my wardrobe.  They are so easy to wear in the summer heat and I need more in my rotation.
This is the third time I've made the Christine Haynes Sylvie dress.  Once I find something that works I stick with it! I like the somewhat relaxed fit, gathered skirt and big pockets.  I chose the Cotton + Steel rayon fabric before I decided which pattern to pair it with and the Sylvie came up the winner.
I underlined the bodice with a simple white cotton and lined the skirt with the same.
The pockets and middle panel have piping added to them, although the fabric is so busy you can't really see it.

On to the next dress!


Saturday, May 12, 2018

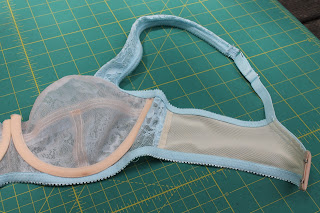
Boylston Bra

I finally dove in to bra-making and I was surprised to learn it's really not that hard!  The most intimidating part for me was just getting started.  

My initial hesitation was that I didn't know where to begin buying the supplies.  I've sewn enough garments that I can find my way around most patterns and fabrics, but bra-making is so completely new to me that I felt lost by the supplies list.  This led to procrastination.  I would surf the internet to fabrics and then get up and walk away from the computer because I just didn't know what to pick.  

I chose as my first pattern the Boylston Bra by Orange Lingerie.  Thankfully, Tailor Made offers bra kits and I decided to go with one instead of trying to find all of the elastics and fabrics on my own.  That was a great decision and one I would recommend to everyone who is just starting out.  The whole shebang shows up in a bag and you're ready to go.

I also invested in the Craftsy course titled Sewing Bras: Construction and Fit with Beverly Johnson.  That was another great decision.  She patiently walked me through every step of the process and made sewing the pattern seem extra easy.  I liked her so much I bought the next class in her series titled Sewing Bras: Foam, Lace and Beyond.  I noticed that she also offers kits through her store.  

(This is my practice bra so the underwires in the center aren't bartacked down yet.)

When I was midway through I realized that I was sewing with lace which I've not sewn with before.  Not only was I sewing a bra for the first time, but I was sewing with lace for the first time.  If  I had it to do over again I think I might pick a different fabric than lace to start with, although I don't have major regrets there.  

I enjoyed the process of making this and I believe I'll make more in the future.  I think the thing that made it worthwhile to me is it's a completely new skill set for me and therefore felt exciting and challenging.  I love learning new things and I'm sure that's part of the excitement of sewing for others as well.  

If you've considered making a bra, I encourage you to jump right in.  It's really not that hard.  Seriously.  It's NOT that hard.  


Monday, April 2, 2018

Simplicity 8262


I ordered several fabrics from Style Maker Fabrics all at one time several months ago.  I prioritized the other three ahead of this red wool which left me making a lined wool coat in the spring.  I was determined to finish it because I didn't want a UFO which worked out ok because it snowed yesterday and my kids went sledding on Easter.

I like the peplum quite a bit but I'm a little undecided on the double collar.  At first I liked it a lot, but I think it would work better if it wasn't quite so large.  I interfaced both collar pieces as suggested which made it really bulky.  Each collar piece is two pieces sewn together, which accounts for five layers when the collar pieces are sewn to the neckline. I broke three needles just attaching the collar pieces to the neckline. If I had it to do again I would interface just one collar piece instead of two out of the four and I wouldn't interface along the seamline.  
The collar is really bulky in the back and stands up quite high on my neck.  I steamed it a lot and maybe as time passes it will calm down.
The lining is fun.  
I had a major disaster occur on one of my facing buttonholes.  I chose bound buttonholes and for some reason I decided that I wasn't going to add my facing buttonholes until I had already attached the facing to the coat.  It was a horrible idea and I have no idea why I thought it was a wise choice.  The top buttonhole is so close to the neckline that it was terribly awkward sewing it on.  The real problem occurred when I sewed the interfacing to the wrong side of the facing instead of the right side.  The above picture was my best attempt to salvage it by removing the first one I did and sewing it on right which was made harder by the fact that I had already cut into the fabric. It looked hideous so I made a separate buttonhole and hand-stitched it to the facing.  It's not great but it looks better than it did.  
In addition to sewing it on the right side of the garment, in the future I'm going to use fabric instead of interfacing for the facing buttonholes.  The interfacing looks messy to me even if I do it right and I think the fabric will work just as well.  Then I can stitch around the facing buttonhole instead of steaming it to make it adhere.  
My face sums up my feelings about the weather we are having.  I can't even force a smile. 
Please make it stop!